Lately, I have been using ASP.NET MVC exclusively on a lot of projects and have been looking for a clean way to enforce the DIP (Dependency Inversion Principle) utilizing the Strategy Pattern throughout my applications. If all of these terms seem alien to you, then you should really look into reading about them. If you want to write highly maintainable code (that is subject to spec changes every month), work very little to achieve this, and in general have clean code, these principles will go a long way to helping you out. Also, once you start doing things this way, you will never want to go back to the old clunky way of over-inheritance, and coupled-ridden code. Before you go farther, if you don’t know what these things are, do your-self a favor and Google “Dependency Inversion Principle” and “Strategy Pattern” and do a quick read on the subject. Once you get the hang of these ideas, a Dependency Injection Framework (also referred to as Inversion of Control Containers), essentially helps you very quickly enforce and setup your DIP throughout your code seamlessly and effectively. It’s a tool to help you achieve this principle and pattern throughout your code.
So after playing around with several Dependency Injection (DI) Frameworks (Unity, Spring, etc) I finally settled on one that I instantly fell in love with because of its simplicity, speed, and complete flexibility: Ninject (www.ninject.org). It is by far one of the simplistic dependency injection frameworks I have found, and fits within how I like to do things. A lot of other DI Frameworks want to be setup through a configuration file (most likely XML) to state how to handle casting and creating of your abstractions to concrete classes. However, Ninject is all about coding modules to setup your dependencies (which you can refer to configuration files there if necessary). It is also completely open so that you can modify and build on it to suit your needs.
Now don’t get me wrong, there are several great DI Frameworks out there, so before you flame me, here me out. DI Frameworks are like opinions, people have several of them. Each person thinks theirs is the best, and you cant tell them any differently. The beauty here is that you just use what works for you. The ideas I will post here should be usable through-out any DI Framework with some massaging.
So, back on course, I wanted to write a blog post about using the Dependency Injection Framework Ninject with the ASP.NET MVC Framework. I utilized it in a standard ASP.NET Web Forms project and it work as advertised. Let us take a real quick look into how it looks (if you really want to see what it is all about take a look at these URLs (http://dojo.ninject.org/wiki/display/NINJECT/Home , Screencast by Justin Etheredge: #1 Introduction to the Ninject IoC Container #2 Diving Deeper into Ninject -- Contextual Binding )
Lets start with the common MVP Pattern in a Classic ASP.NET Web Form application and then when we understand those concepts, apply it to a ASP.NET MVC Web Application.
Typically you will need to setup a Module to define how Ninject should handle your Abstractions to Concrete classes: 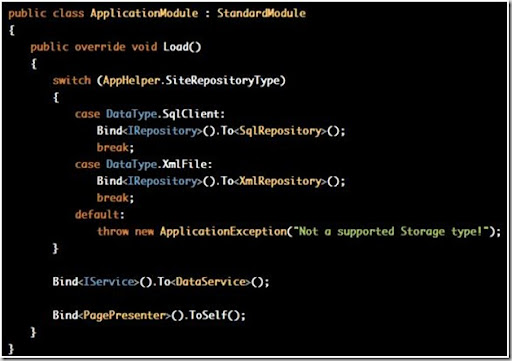
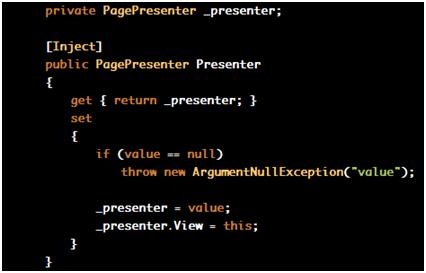
In this example I am telling Ninject how to inject my abstractions IRepository and IService to what Concrete class I want it to be (the AppHelper is a static class that handles grabbing which configuration details are needed for my application – similar to how Rails does this). You can see the syntax is very readable. You simply tell it that you want to bind this abstraction to this concrete type: Bind<AbstractionType>().To<ConcreteType>(). The only weird one up there is the Bind<PagePresenter>().ToSelf(). This one is simply telling Ninject that if I ask you go give me this type, just instantiate it (you could also specify default constructor parameters for Ninject to use, or when you want it to make it). You could have just omitted this, as it does this by default, but I like to be explicit in my rules.
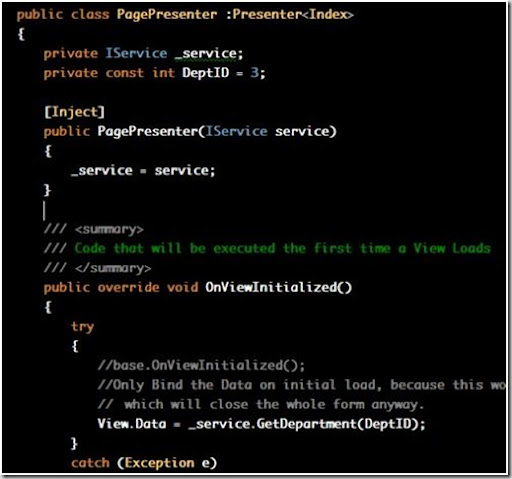
There is no voodoo going on here. To further clarify what is going on and how it handles creating these abstractions to your concrete classes down the chain, let us look at a brief implementation of the presenter, service, and repository classes (because when we create instances of it we will be creating a Presenter, that will in turn need a Service, that will in turn need a Repository implementation instance):
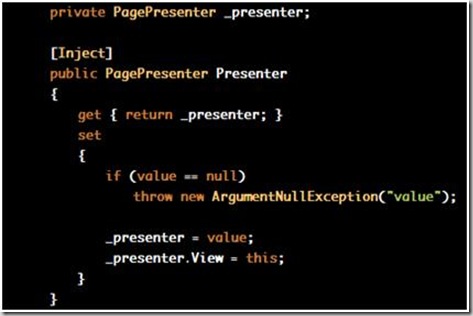
Presenter:
Service:

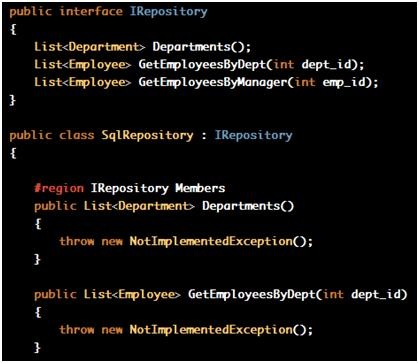
Repository:

As you can see, using MVP (Model View Presenter), in the view we will need the following:
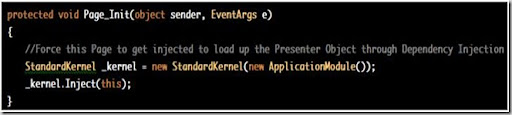
The only piece necessary now, is to set your view (or you can simply use NinjectHttpApplication for your Global.asax.cs and PageBase for your View located in Ninject.Framework.Web) to load up your Presenter using Ninject:
The injecting of the this object on the view will see the Property with the attribute “Inject” and start the chain of creating all of your concrete class instances from looking at the Abstract type it requires (using the Module we defined earlier). We didn’t have to write a single new line in our code, Ninject handled all of this for us.
Ok, so it works really nice in ASP.NET Web Forms, but what about ASP.NET MVC. Well, this is where it required me to extend Ninject, as it doesn’t add helper support to ASP.NET MVC that fits nicely in the ASP.NET MVC style of doing things.
Typically as you saw above, we get the view to inject all the way down the tree of instantiations. What you didn’t see is you can use Ninject.Framework.Web to help in your Global.asax class file (by changing it from HttpApplication to NinjectHttpApplication) to handle a lot of this setup for us, and make your Page inherit from PageBase to auto-inject the view and start it down the chain.
So how would we do this in MVC? Well you could do the same thing with the Global.asax file and make a base Controller class to inject the controller instance object, or you can do it the MVC way, and make it nice and clean.
So what is one way to do that?
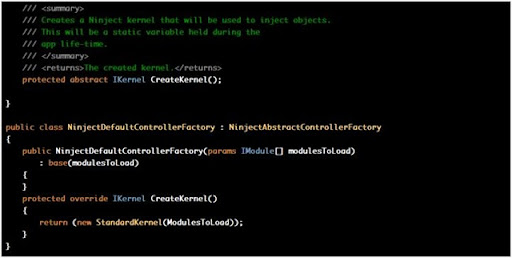
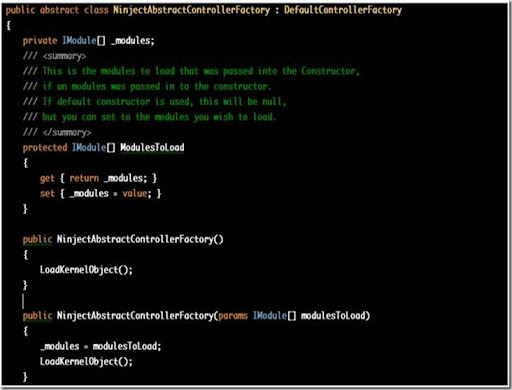
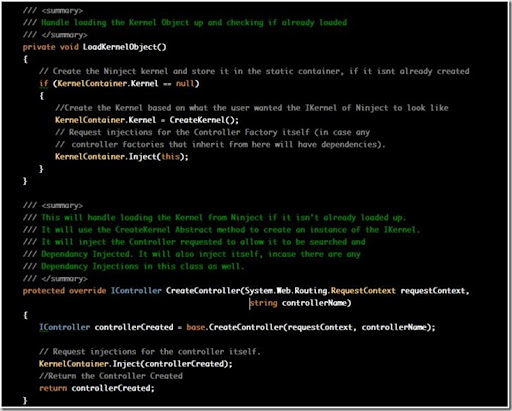
I am glad you asked. First I had to think about how a classic ASP.NET page works using the MVP pattern and how it works using the MVC pattern. The classic ASP.NET page request first comes to a web page, so the view is the one to get the initial response, so it makes sense to start the chain of injections from there on down. But in MVC, the request first comes to the Controller, so logically we need to start the chain of injects starting there. The most effective way to do this (without tying the Controller to a base class of say NinjectControllerBase – in case we want to utilize some swanky open source ideas out there that need this) is to use a controller factory to handle all of this for us.
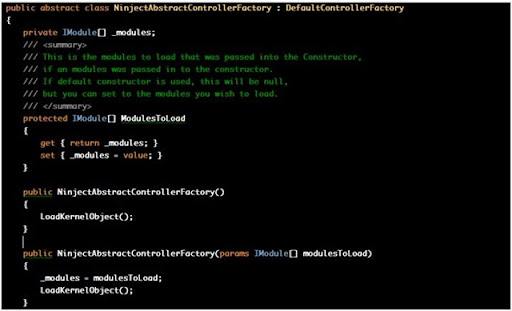
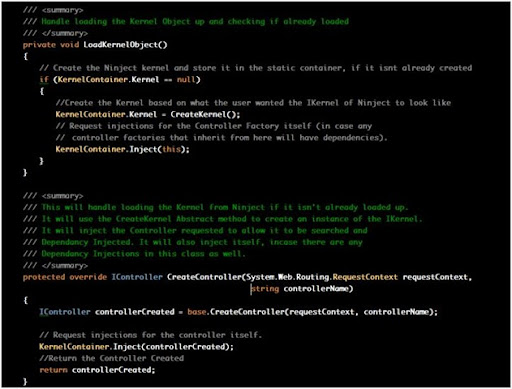
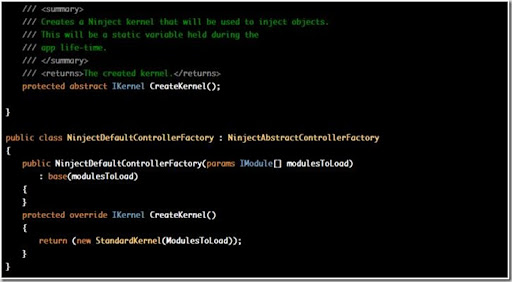
Here is such an implementation of one (keep in mind that KernelContainer is located in Ninject.Framework.Web, and the bottom code would be put into a dll that you can add to all of your MVC applications) :
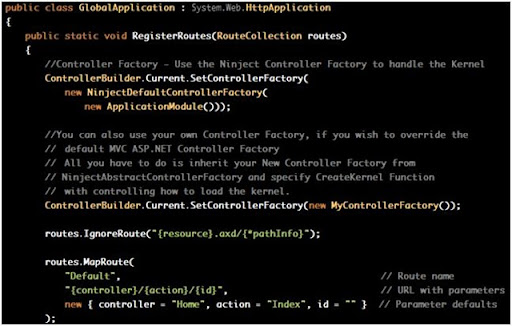
So what does all of this allow you to do? Well assuming you package up the above into its own dll (say Ninject.Framework.MVC), you can just add it to your project and do the following to add Ninject support to your application.
1) Use the simple default Ninject controller factory to add in support in your Global.asax file in the RouteTable function.
2) Make your own Controller Factory and inherit from NinjectAbstractControllerFactory and just override CreateKernel (this is where you would make a new Ninject Kernel with the Module we created early on), then in the Global.asax file add it when building the routes for you MVC application.

As you can see here you can call it 2 ways. If you don’t care about utilizing a Controller Factory, then you can just use the first method, that builds the controller factory for you and sets up your injections for all controllers for you. You can alternatively make your own that inherits from the above NinjectAbstractControllerFactory. You can chose how you want it to load.
This is a great way to have IoC/DI in your MVC application without getting in the way of your other code. You set it and your rules and forget about it. From there you can just start marking up “[Inject]” to those constructors, properties, etc you want Ninject to take care of.
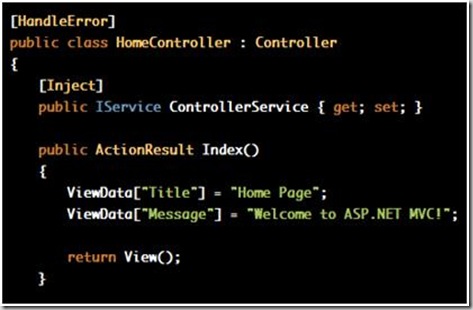
This example will load DataService and the Repository (in the IService implementation) that we specified in our module. Similar to how it worked in the MVP pattern mentioned above, except our Controller Factory did all the setup for us behind the scenes and tucked away.
Feedback, questions, comments. Keep in mind this is merely one approach, there are several others that can be taken, but I like this one. I have used it on 3 projects so far, and it really is efficient and simple to setup.
If anyone knows of a good place to store code, I can zip up all of this code and make a simple example for you to play with and tweak to how you would like it to work.
For now, as per suggestion, you can copy the above code (the Factory Code) from google docs here.