Visual Studio 2010 introduced a new way to do Web Deploy using a Transformation mechanics. At first glance, it can appear complex if you have never used XSLT Transforms, however, this doesn't need to be complex or difficult, and you really don't need to know XSLT Transforms to do this. There are a lot of blog posts about how you can write your own XSLT Transforms or change the way it works in VS2010, however, very few show you how simple you can use the existing features. That is my focus in this post.
Simple way to change settings for Release in Web.config
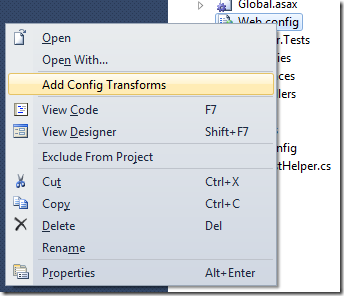
First make sure your Web.Config has a dropdown arrow next to it. If it doesn’t simply right-click on your Web.Config and select Add Config Transforms.
This will add two or more Web.Config Transform files under the Web.Config
- Web.Debug.config
- Web.Release.config
- Others if you have more setup under the Configuration Manager
If you double-click one of these files, you will be presented with a very blank and confusing place to start if you have never seen XSLT Transforms before. Do not worry if you haven’t. I will cover 3 simple cases to get you started using them and feeling comfortable with them, and you can grow and learn more about them with some links I will provide to do even more powerful things.
It is important to note that your Web.Config in your application is your base configuration details. The Config Transform files are used to change sections or individual settings from the base config. This is the mindset you need to have when changing things and deploying a new web.config.
How to get started using the Config Transform file to change settings for Production
The first case I will cover is the case where you need to completely replace a section in your Web.Config such as AppSettings.
To accomplish this simply write the following in your Config Transform file (such as Web.Release.config):

Notice that I have added the AppSettings section to the Config Transform and added a xdt:Transform=”Replace” to it. This instructs the deployment to completely replace what I have in my AppSettings in the original Web.Config with this ones, if I am deploying with the Debug Configuration (we will get to deploying in a bit).
As a result of the above setting, the debug deploy will contain a AppSettings section with 3 settings here, even though my base has completely different values in it.
What if you wanted to only change a setting value and not a complete section? How would you accomplish this?

This instructs the Web Config Transform that you wish to find a Setting called “MyDbConnection” in the ConnectionStrings section of your Web.Config, and completely change the attribute settings that you are specifying (it will only change those attributes you write here, if there is a attribute that you do not wish to overwrite, simply don't add it here, and it will copy over).
This is accomplished by the two statements:
- xdt:Transform="SetAttributes"
This instructs the Config Transform to replace or set any attributes on this setting from the base Web.Config - xdt:Locator="Match(name)"
This instructs the Config Transform to match the setting based on the name attribute you have given in the exact location. Meaning, it is saying Match the setting under the ConnectionStrings with the attribute “Name” called MyDbConnection, and replace or set any attributes I have listed here.
Note above I am using the Transform “SetAttributes”. If you had used the xdt:Transform="Replace" instead, it would simply had replaced the whole setting by that matched name. So instead of setting the Attributes specified, it would replace the setting with this one from the default Web.Config.
Great, now how do I add new settings without replacing a whole Section in my Web.Config?

Notice I added a new Setting in the ConnectionStrings called “AddedConnection”. This will be added to the end of the connectionStrings from the default Web.Config by simply specifying xdt:Transform="Insert" in the setting.
Publish My Web Application
To publish your Web Application simply right-click on the web application and select “Publish”.

There is a myriad of options here, to keep it simple, I will select FileSystem as the Publish method, but you could just as easily select Web Deploy, FTP Deploy, and it handle all the details of this through your settings.
Once you click Publish
Original default Web.Config Values: 
The Published version of the Web.Config values: 
Great, now how do I find out how to do more advanced things?
The MSDN Documentation is a great place to drill down on the details: here and Scott Hanselman did a great Mix 10 talk on this and is a great place to start in getting a lot more advanced here.
I hoped this helped you in some way to get started doing things at least a bit more structured and utilizing this incredibly powerful way of doing deployments. You can literally do a lot more than what I have shown you, and you can even deploy T-SQL Scripts to run against an environment in conjunction with publishing your site. Take a look to get a lot more in depth.
And as always you can reach me and send me comments at my email corey@acadianaug.org or through my twitter account @CoreyGaudin.
Have fun coding.

